
How to Remove Floor Mat Clips in 5 Simple Steps
Removing floor mat clips might seem like a simple task, but if you’ve ever tried it, you know it can be tricky. Whether you’re upgrading your floor mats, replacing them, or simply cleaning them, knowing how to remove floor mat clips correctly is essential to avoid damage. These clips, which secure your mats in place, are designed to be sturdy and functional. However, without the right knowledge or technique, removing them can lead to frustration or broken clips. In this guide, we’ll walk you through the step-by-step process of how to remove floor mat clips easily and safely.
Understanding Floor Mat Clips


Before diving into the process, it’s important to understand the different types of floor mat clips that might be used in your vehicle. While most clips serve the same purpose, securing the mat to prevent movement, their design and the method for removal can vary based on the manufacturer and vehicle type.
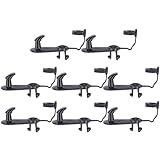
Button Clips
Button clips are commonly found in many vehicles and are fairly easy to remove once you know the technique. These clips work by securing the floor mat with a button mechanism that “locks” the mat in place. To remove them, you typically need to lift the mat and either press the clip’s button or slide it out. The button clips can be either plastic or metal, and they usually make a clicking sound when they are securely fastened.
Twist-Lock Clips
Twist-lock clips require a simple twist to release the mat from the floor. These clips have a rotating mechanism that locks the mat into place. To remove the mat, you need to twist the clip counterclockwise (or clockwise, depending on the design) until the lock is released, allowing you to lift the mat free. These are often found in vehicles with more specialized interior designs.
Hook Clips
Hook clips are another popular option for securing floor mats, especially in older models. These clips have a hook shape that grips the edge of the floor mat. To remove the mat, simply lift it up and slide the mat out of the hook, taking care not to damage the clip.
Why Removing Floor Mat Clips Can Be Tricky
While it seems like a straightforward task, removing floor mat clips can be tricky for a couple of reasons. First, not all clips are designed to be easily removed. Some are designed to stay firmly in place to prevent the mat from shifting. Second, without the right technique, you risk breaking the clips or damaging the vehicle’s interior.
Moreover, each type of clip may require a different removal process, so knowing the specific clip type is crucial to avoid unnecessary damage.
How to Remove Floor Mat Clips Safely
Now that we have a better understanding of floor mat clips, let’s get into how to remove them from your vehicle. While the process will vary depending on the type of clip, there are some general steps you can follow.
Step 1: Gather the Right Tools
Before you start removing floor mat clips, it’s a good idea to gather the right tools. For most clips, you won’t need anything special, but having a flathead screwdriver, pliers, or a plastic trim removal tool can make the process easier and prevent you from damaging the clips or the mat.
Step 2: Assess the Type of Clip
Take a moment to inspect the floor mat clips in your car. Are they button clips, twist-lock clips, or hook clips? If they’re button clips, you’ll need to slide your hand under the mat and apply some pressure. Twist-lock clips require a twist to unlock. Hook clips can be more challenging, but they just need to be lifted properly.
Step 3: Remove Button Clips
Button clips are generally the easiest to remove. Start by placing one hand under the mat, close to the clip, to hold the clip in place. With your other hand, gently lift the mat upwards. You’ll likely hear a clicking sound when the clip releases. Once the mat is free from the clip, carefully remove it from the footwell. Take care not to yank the mat forcefully to avoid damaging the clips.
Step 4: Remove Twist-Lock Clips
If your vehicle has twist-lock clips, the process is a bit different. Place one hand under the mat to hold it steady and use your other hand to grip the twist-lock. Rotate the clip counterclockwise to release the lock. Some twist-lock clips might be a bit stubborn, so don’t force them—apply gradual pressure, and they should unlock. Once you’ve twisted the clips, simply lift the mat out of the footwell.
Step 5: Remove Hook Clips
Hook clips can be more difficult to deal with because they require you to maneuver the mat around the hook. Gently lift the edge of the mat nearest the hook, and slide it out carefully. If the hook is tight, you can use pliers to ease the mat off. Always work slowly and gently to avoid bending or breaking the hook.
Step 6: Clean and Replace the Floor Mats
Once the clips are removed, it’s time to either clean or replace your floor mats. If you’re cleaning them, take care to remove any dirt and debris from both the mats and the area underneath. Replacing the clips or installing new floor mats may require you to follow a similar process, but be sure to check that the clips are securely in place after the mats are installed.
Step 7: Reinstalling Floor Mats and Clips
If you’re reinstalling the clips after cleaning or replacing the mats, carefully position the mat back in the footwell. Start with the clip that holds the mat in place, and ensure it’s secured tightly. Whether you have button clips, twist-locks, or hooks, ensure each fastener is properly engaged. Once the mat is locked in place, give it a tug to make sure it won’t shift.
Common Mistakes to Avoid When Removing Floor Mat Clips
While removing floor mat clips is generally a simple task, several mistakes can hinder the process or lead to damage. Below are a few common mistakes to avoid:
Forcing the Clip Out
If you encounter resistance when removing a clip, don’t force it. Applying excessive force can damage the clip, the floor mat, or even the vehicle’s interior. Instead, try using a plastic trim tool or pliers to gently ease the clip out.
Not Identifying the Clip Type
Every floor mat clip is different. If you don’t identify the clip type (button, twist-lock, or hook) beforehand, you may end up damaging it. Always assess the clip before you begin.
Ignoring the Mat Position
Sometimes, floor mats can shift or move out of place, causing the clips to become misaligned. Be sure to reposition the mat correctly before securing the clips to avoid uneven wear or difficulty removing the mats later.
How to Replace Floor Mat Clips
If your floor mat clips are damaged or worn out, replacing them is essential for proper mat installation. Replacement clips are typically available at automotive stores or online, and you can easily install them yourself. The process for replacing clips is the same as for removing them—just follow the instructions for the specific clip type.
Conclusion
Removing floor mat clips doesn’t have to be a daunting task. With the right tools and a little know-how, you can easily remove and reinstall them without causing damage. Whether you’re cleaning your mats or replacing them, understanding how to remove floor mat clips is an essential skill every car owner should have. By following the simple steps outlined in this guide, you’ll be able to keep your car’s interior clean and your floor mats securely in place.